BLOG BUDDIES

Showing posts with label altered art. Show all posts

July 27, 2020

Lighted Altered Paint Brush for Reneabouquets

Hello to our Reneabouquet family and friends. Every month RB hosts a swap that you can participate in and it's a great way to make new creative friends and share your love for paper crafts with another. This month's swap was to create an altered paint brush, here is my take on it.
I purchased a brush from Dollar Store 3" wide which provided a nice amount of space to create on. Below I have a video tutorial so you can watch the different mixed media techniques that I used to get this effect... very easy to do.

The main focal point on the brush was the sweet RB shadow box. They are so much fun to work with and so versatile. I decided to add some fairy lights just for effect. If you haven't worked with these shadow boxes you need to get your hands on them especially with the holidays approaching. They are so much fun to create with. 
As always, RB never disappoints when it comes to their beautiful flowers and Beautiful Board. I will leave a list of all supplies used from the store below with their links for easy access. I invite you to participate in our swaps. I get so excited when I receive my package in the mail from a fellow crafter that I know has specifically created something just for me. Give it a try... Until next time, xoxo

August 13, 2019

Mixed Media Beach Board for Art Anthology

Hi everyone, I'm up on the blog today to share with you my latest DT project for Art Anthology.
I purchased a clip board from the dollar store and transformed it into a picture frame of my daughter and niece about 25 years ago. 
Using some natural elements like twigs, driftwood, seashells, moss and adding some paper clay beach elements as well as fishnet & assorted flowers, I was able to capture alot of pretty texture to create with. 
Art Anthology supplies really allowed this frame to pop with color. I used Colorations Sprays, Minx Shimmering Ink, Sorbets, Stone Effects & Metal Effect. I will list the supplies and their websites below. 
For your pleasure I have also included a video tutorial below so you can view my creative process... Wishing you a week filled with peace... hugs 

Art Anthology Supplies Used
Colorations-Timeless, Wiamea Bay, Siesta Key, Sandcastle, Granny Smith
Minx Shimmering Inks-Decadent, Gold Dust
Sorbet-Seaweed
Metal Effects-Gold
Stone Effects-Bone

June 23, 2019

Mixed Media Embroidery Hoop for Art Anthology

Hello everyone, let me begin by first saying thank you for stopping by, I really appreciate your visit and comments. Today I have a design team project for Art Anthology. I decided to alter an embroidery hoop using AA's beautiful mixed media products. 
I started off by using a stencil with homemade texture paste (3/4 C baby powder, 2 Tbsp glue, 2 Tbsp white acrylic paint... mix well). Set aside to dry and then adding some texture to my chipboard frame with AA's Stone Effect-Bone. 
I created some mold shapes using hot glue and also painted them using assortment of AA's paints. A list of them will be listed in the video description that I have provided for you below. 
I hope you have been inspired to create something a little bit different. Have fun and enjoy your weekend... Hugs

April 30, 2019

Altered Dollar Store Notebooks

Hi everyone, I'm up on the blog today for an Art Anthology design team project. I'm always finding wonderful things at the dollar store and they can always be used in my art. Today I am altering some of there little notebooks or journals. These are great to send to someone for happy mail or to include in a RAK.
I have a video below showing my creative process on one of the notebooks. These literally only take about 30 to 45 minutes to alter and customize them.  
Using simple mixed media techniques provide that interesting texture and subtle changes to the background. 
The receiver will now have a one of a kind little notebook that you have created with love. I hope yu grab yourself some of these sweet little journals and give this altering process a try. Have a spectacular day !

April 15, 2019

Mixed Media Vintage Frame for Art Anthology

Hi everyone, I'm up on the blog today with a design team project for Art Anthology. Recently purchased a frame at the dollar store and it was screaming to be altered. 
Lots of layers, lots of texture and a color scheme that is not usual for me. But it definitely has that grunge appeal that I so adore. 
I love taking a simple item and making it into an unexpected piece. I started off by adding lace to the foundation to provide interesting textures, then layered several different shades of inks and sprays. 
Utilized some of my metal pieces, chipboard and ideaology stash. I so enjoyed making this messy project. I hope you were inspired. And for your enjoyment I have included a process video below. I appreciate your stopping by. Wishing you a month filled with creative wonder !

February 17, 2019

"Blissful" Butterfly Vignette for ReneaBouquets Design Team

Hi everyone, love is in the air and I love creating with ReneaBouquet items from the store. Today I have a design team project entitled "Blissful"

Starting off with Ideaology's Vignette Boxes and Finial I decided to create a butterfly haven. 

All the products I used from ReneaBouquets will be listed in the process video below. I antiqued the vignette and all the beautiful board pieces first to give it that shabby chic look. Added some coiled wire and attached these precious Sugar Spun Butterflies from the store to the wire to provide movement. 
I hope you enjoyed my project, wishing you a month filled with love and creativity !

January 29, 2017

Love Always

Happy Sonday to everyone, I'm up on the design team blog today for Art Anthology with an altered frame I purchased at my local dollar store.
Don't you just love the dollar stores, lots of wonderful items you can take and customize to your own likeing. And if you don't like them you haven't really invested a whole lot of money in the product so no worries. I've had this photo of my daughter for quite awhile and means Valentines Day is coming up thought this would be a fun project to work on. 
Lots of textures using crackle medium and paste, along with cheesecloth and chipboard pieces that were grunged up a bit. The flowers were altered with different shades of pinks and reds and highlighted with gold metallic paint. For a full list of Art Anthology products used, please visit the blog HERE. 

The key was created with a mold I made using Amazing Mold Putty, you can view a Snapguide tutorial HERE that I created to check out the process. I of course added more texture paste to the key and different shades of paint to provide that old vintage look, then finished it off with wrapping some gold wire around it. 
And to add a bit of bling I alcohol inked some crystal rhinestones to add here and there to the frame. I hope this has inspired you to get creative with your mediums, have fun and enjoy the journey.
Love Always, Toni

For your pleasure I have provided you with a Snapguide tutorial to view the process of my creation. 

November 1, 2015

The Journey

Hi everyone...it's another month and time to alter up something fun for Rhedds Creative Spirit challenge blog.... I saw this YOUTUBE by Tim Coffey where he recycles a cereal box to use it as a canvas and then create a piece using a glue gun for the texture on his images...well I had to try it. 
This is what I started with... 
And this is what I created 
I won't go into great detail with the piece but I do have photos to share of the process. 
First we need to prep the box by covering it in masking tape. 
Next up give your box a coat of black gesso. Using black allows a better coverage of the graphics on the box. Once dry, give it a coat of white gesso. 

 Next up gather your image and mod podge onto your canvas
Now the fun part... are you ready... I probably used 6 glue sticks. Be careful not to burn your fingers. Start tracing over the top of your image. The more detailed you get the better. Watching Tim Coffey do this was amazing... he is so good at it.
 Once your glue is dry coat with white gesso... doesn't that look neat !
Now it's time to get out your sprays, micas, Inka golds, acrylics...  you know all your mixed media wonderfulness and color away. 
 I started with acrylics... some I watered down and allowed to just drip. I then got out my Lindys MoonShadow sprays... They have that beautiful vintage iridescence to them.
I then finished off the tops with Inka Gold in Platinum and Gold. I hope you enjoyed this piece, now check out your pantry for empty canvases... I mean boxes that you can use in your art and have fun ! Be sure to drop by our mixed media & altered blog and post your photo to inspire all of us with your wonderful creations! xoxo Toni

September 24, 2015

You've Been Steampunk'd

Hi all... it's Creative Embellishment time and I just love working with these chipboard pieces. I needed a box to hold some of my favorite steampunk trinkets and I found this box at Hobby Lobby for $6.99 and I had  40% coupon... Cool huh !

Well that.... became this: 
I love organization and this will be perfect for organizing some ... ( I say some) of my steampunk embellies. I have a Snapguide tutorial that you can follow for step x step procedure, but I will fill you in on a few highlights. 
I used Andy Skinner Industrial Stamp set for the cracked look before painting with Quincadron Gold for that beautiful rusty look. The metal on the sides of the box is actually plumbers tape ran through the Vagabond for the embossing effect. 
The chipboard pieces are all from Creative Embellishments... of course and they have such cool steampunk pieces... I ran the pipe chippies through my Vagabond for the embossing and my steampunk lady had her wings topped with SnowTex for some pretty texture. 
The gears and cogs had Art Basics Graphite Texture Paste added to provide a corrosion and rusty effect. 
The compartments were lined with G45 Steampunk Spells paper and then filled to the brim with wonderfulness. I hope you enjoyed this and that it has inspired you to go and "Create Art" ... until next time... xoxo Toni

Creative Embellishments Chipboard pieces used are: 


I am entering this project in the following wonderful challenges:
That Craft Place Challenge - Steampunk
Anything But Cute - Mixed Media Makeover
Eclectic Ellapu - Pink Team Anything Goes
Altered Eclectics - September Anything Goes
Try It On Tuesdays - Add Some Metal

Check out How to Create a Steampunk Box for Trinkets by Toni Burks-Grijalva on Snapguide.

September 16, 2014

Back To School


Craft Hoarders Anonymous challenge theme is "Who Loves School and Office Supplies" and who doesn't. My daughter always said that was her favorite part of starting school is to go get all her new paper, pencils, pens, etc.
My project was made for my daughters BFF. She just received her teaching credentials and has her first class of 4th graders this month.
I got this inspiration from Tara Orr's blog (an amazing G45 designer) and immediately knew it would be perfect for Amanda's desk.
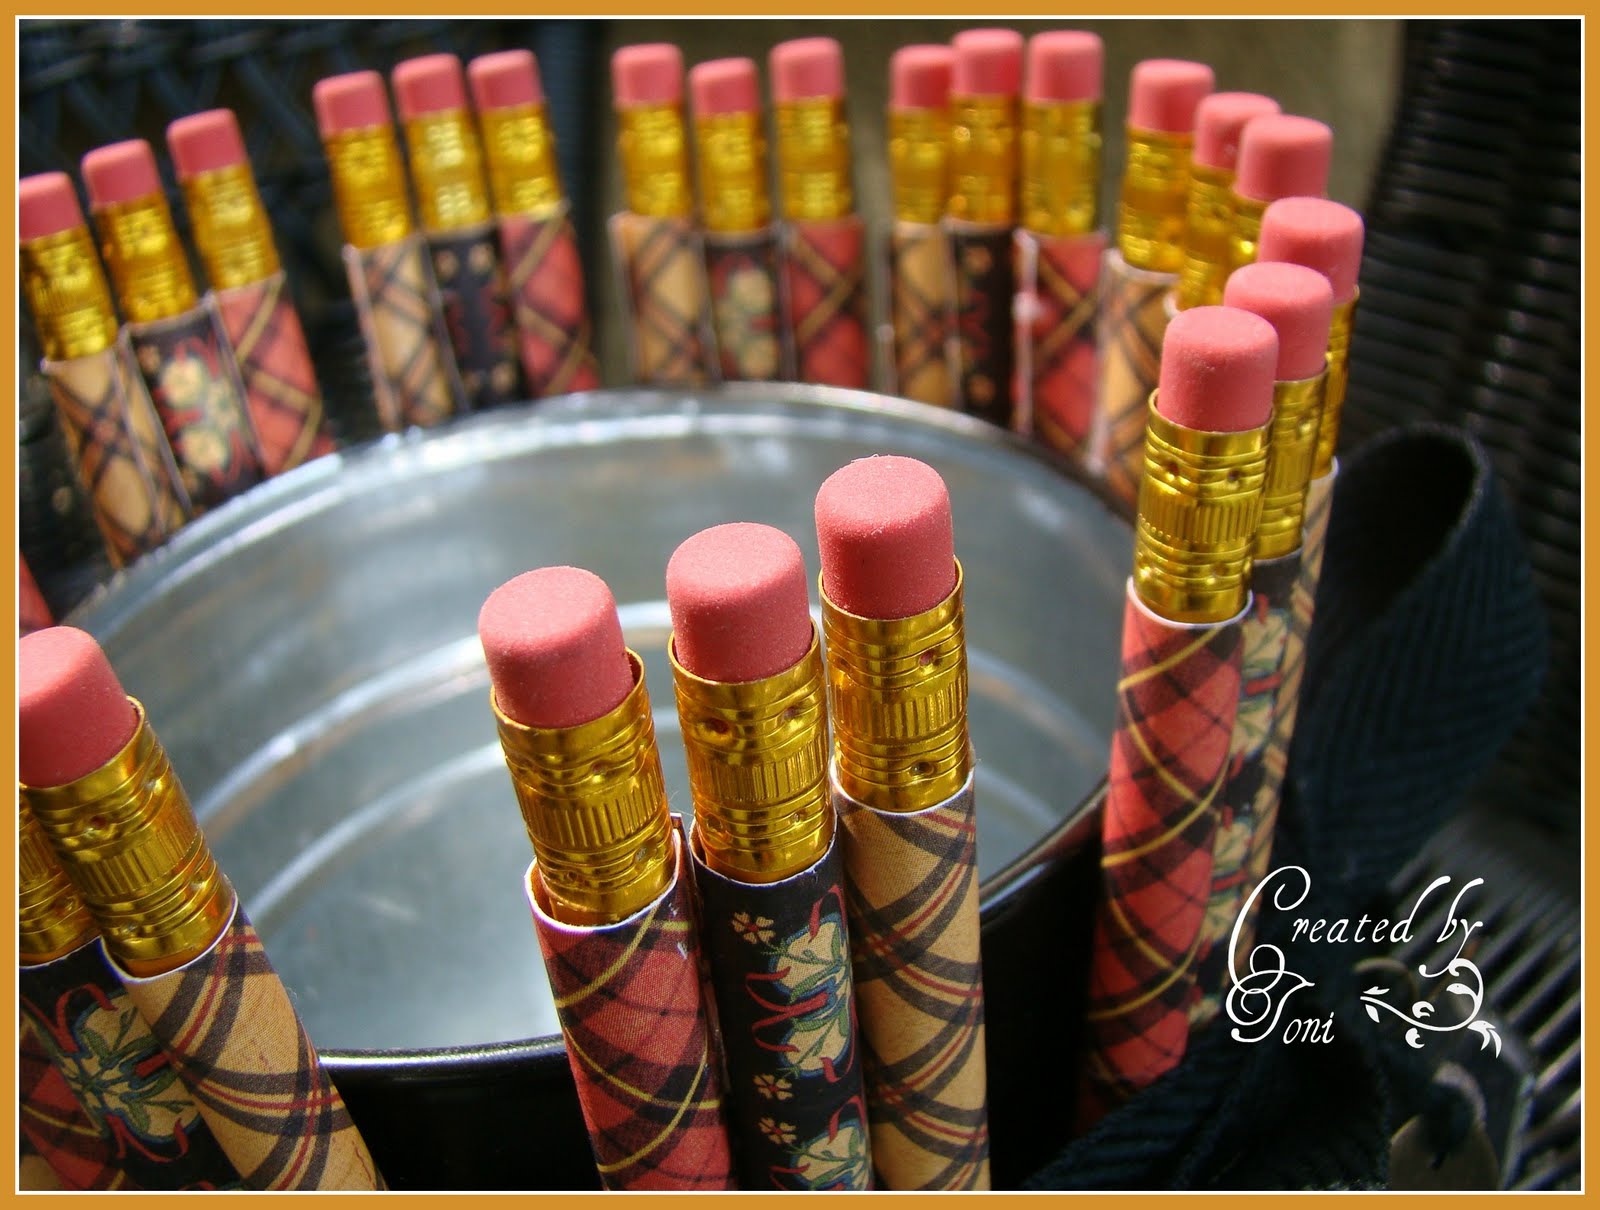
Purchased this tin and pencils at the Dollar Store and painted the tin black.
Used the G45 paper line "ABC Primer" and covered each pencil. The pencils were then glued to the outside of the bucket. Ribbon was tied around the pencils and a tag was made. Distressed the edges and embellished it with brads.
 
A coat of Rock Candy crackle paint was applied for texture and to finish it off I added a Muse Token from Ideaology.
Congratulations Miss Amanda, we know you are going to be a wonderful teacher !
art (ärt) noun - supplement, alter, or counteract the work of nature. The conscious production or arrangement of sounds, colors, forms, movements, or other elements in a manner that affects the sense of beauty.