BLOG BUDDIES

Showing posts with label lindys stamp gang. Show all posts

November 15, 2015

Moments With The Master

Hi all.. Toni here with another project for Unruly Paper Arts and our theme is "Noteworthy".  I picked up some of these journals awhile back for $1.

I thought they would be perfect for my friends daily devotional journals and with Christmas right around the corner they would make great gifts.
There are so many things you can do to these books. I wanted to keep them pretty simple because they will be writing in the books, so I left alot of the ribbons and such from the sides of the books. 
I cut a hole in the center of the cover to have there initial peep through. I actually saw some journals with this hole is where I got the idea, but the store was out of those journals when I went back so I made my own holes in these. 
The flowers and ribbons were colored with assorted Lindys Stamp Gang sprays and magical micas. 
The little crosses were purchased at Hobby Lobby for $1.99 a bag and then transformed using Deco Arts crackle varnish and antiquing creme. I loved how they turned out.  I have several more of these books to make and hope my friends enjoy journaling their "Moments With Their Master". 

Please feel free to enjoy my Snapguide tutoral of my creative process below: 


Check out How to Alter Inexpensive Journals by Toni Burks-Grijalva on Snapguide.

November 6, 2015

Fall In Love With Art ... for Creative Embellishments

It's a new month and new inspiration from Creative Embellishments to get those artsy wheels turnin....First off... check out this great pic with all those fun fall elements and the pretty color palette. The added twist for this challenge is to incorporate a flourish in your piece.
This was my design team interpretation of the photo...
I created this canvas by first using Art Basics's Graphite Texture Paste and running it through a brick stencil. Once dry I added Inka Gold in Platinum and Gold to highlight the bricks. 
I then gathered my Creative Embellishment chippies gobbed on some beautiful mixed media products. The dragon fly flourish was painted with acrylic and then aqua stickles were added for a pretty bling. 
The Falling Leaves chippies I primed them first with white gesso and then applied assorted Lindys Stamp Gang Magical Micas  that provide such a glorious iridescent glow. On the pumpkin corners I painted them first with acrylic then coated them with DecoArts Liquid Glass (much like Glossy Accents) and while still tacky I dribbled Alcohol Ink in Ginger here and there and then sprinkled some seed beads for texture. 
The mushrooms were simply covered with Art Basics Texture Paste Sand and then once dry I added Distress Ink in Walnut Stain and Vintage Photo. My frame was painted with black gesso and then using Inka Gold I rubbed the high areas for a gilded effect, then added my title which was printed on the printer and then sprayed with Lindys for a vintage look.  I hope you will come create with us this month and have an opportunity to win some free merchandise from Creative Embellishments. Happy Fall and have a creative week !
The following Creative Embellishment products were used:

November 1, 2015

The Journey

Hi everyone...it's another month and time to alter up something fun for Rhedds Creative Spirit challenge blog.... I saw this YOUTUBE by Tim Coffey where he recycles a cereal box to use it as a canvas and then create a piece using a glue gun for the texture on his images...well I had to try it. 
This is what I started with... 
And this is what I created 
I won't go into great detail with the piece but I do have photos to share of the process. 
First we need to prep the box by covering it in masking tape. 
Next up give your box a coat of black gesso. Using black allows a better coverage of the graphics on the box. Once dry, give it a coat of white gesso. 

 Next up gather your image and mod podge onto your canvas
Now the fun part... are you ready... I probably used 6 glue sticks. Be careful not to burn your fingers. Start tracing over the top of your image. The more detailed you get the better. Watching Tim Coffey do this was amazing... he is so good at it.
 Once your glue is dry coat with white gesso... doesn't that look neat !
Now it's time to get out your sprays, micas, Inka golds, acrylics...  you know all your mixed media wonderfulness and color away. 
 I started with acrylics... some I watered down and allowed to just drip. I then got out my Lindys MoonShadow sprays... They have that beautiful vintage iridescence to them.
I then finished off the tops with Inka Gold in Platinum and Gold. I hope you enjoyed this piece, now check out your pantry for empty canvases... I mean boxes that you can use in your art and have fun ! Be sure to drop by our mixed media & altered blog and post your photo to inspire all of us with your wonderful creations! xoxo Toni

October 22, 2015

Cherish Special Moments for Creative Embellishments

Hi everyone... it's my turn up on CE's blog today to share with you a layout I created featuring my daughter and our two little fur babies.
The layout foundation was white cardstock. I then custom colored some modeling paste with Dylusions paint in Bubblegum Pink and Crushed Grape and ran it through my crackle stencil for texture. The corners are Hocus Pocus Black Magic Coredinations paper stack, which I ripped first and then crumpled in a ball and then using sand paper I sanded off the top layer which exposed the vivid pretty core colors.
For my Creative Embellishments I chose Feathers and Dream Catcher to enhance my layout. They both were primed with black gesso and then given several coats of Lindy's Stamp Gang Magical Micas in the following colors : Asteroid Amethyst Blue, Blazing Magenta Blue, Pulsar Plum Red, Pluto Periwinkle, and Morning Magenta. 
My title was from the Moments Word Set and was painted white and gold stickles were added to the top. The flowers had 3D Gloss Gel from Prima Art Basics added then the seed beads were sprinkled on the top. I hope you enjoyed my layout and please join in with our monthly challenge at CE where you have a opportunity to win FREE gorgeous product !!! xoxo Toni

The following products were used from Creative Embellishments: 


April 11, 2015

More Precious Than Gold

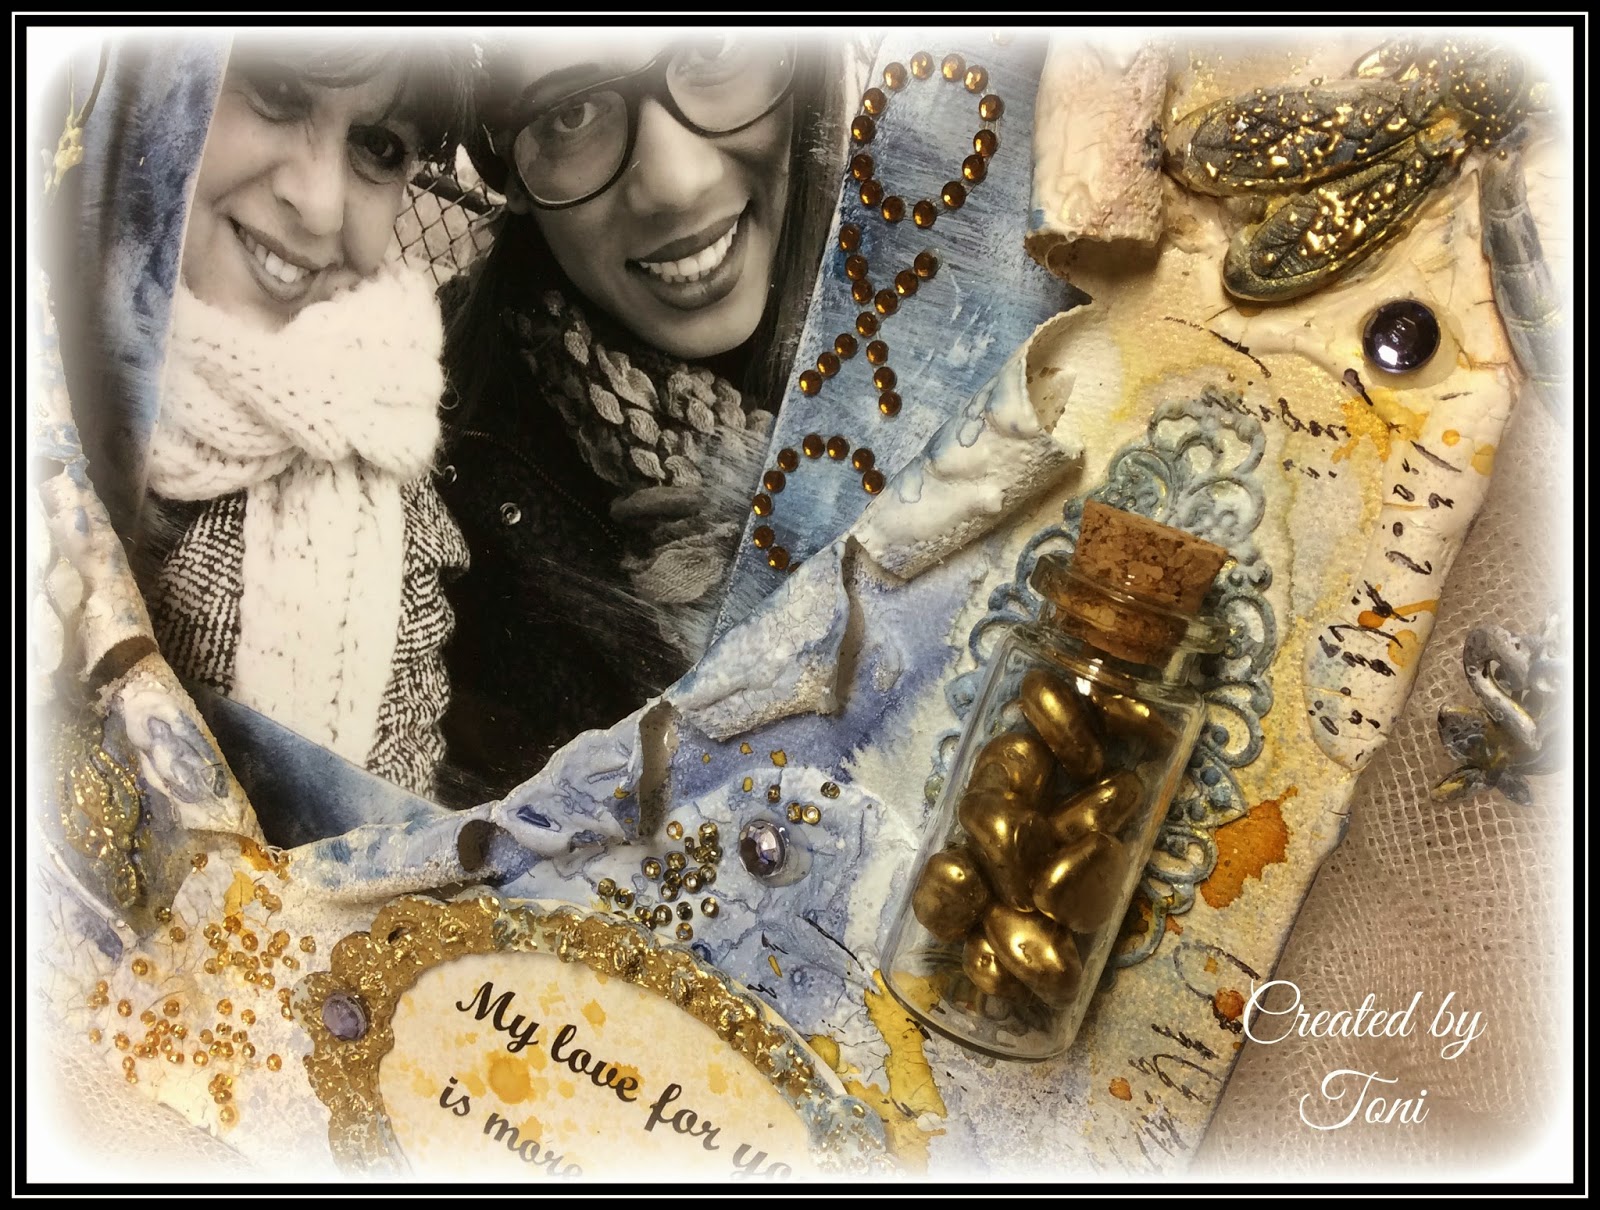
Hi happy crafters... this month at Anything But A Card we are focused on "Fools Gold"... create something using that wonderful color "Gold", be sure to link up with us so that we can also be inspired by your creation. Here is my take on this theme...
I decided to create an exploding canvas. I was inspired by this through ccartdesigns YOUTUBE which you can view that HERE. I just decided to create mine in the shape of a heart.  The photo was of my daughter and I on a frigid morning in Central Park, NY
Molding paste & crackle paste provided my canvas with the texture I wanted. Gold UTEE on the tops of the flowers gave them that gilded look.
Gold embossed rocks added that perfect handmade embellishment which went with my sentiment "My love for you is more precious than gold".
So many things you can do with an exploding canvas. Try your hand in it. Below is a tutorial on my process for creating this. Enjoy and thanks for stopping by !
This canvas is being entered in the following challenges: 
Flying Unicorn  - April Made With Love  -Anything Goes
Eclectic Ellapu- April Showers / Spring


Check out How to Create Explosion Heart Shaped Canvas by Toni Burks-Grijalva on Snapguide.

August 25, 2014

Welcome To My Laboratory

Hi everyone, it's Messy Monday and for quite some time I have been wanting to put together a journal for just my mixed media. I have several journals sitting around for technique, writing, tags, etc... but none for my mixed media experiments or such.
 I had this canvas album from Prima and thought this would be the perfect place for my mixed media projects, ideas, experiments etc.  It allows me to add pages, it's bulky so will allow those more 3D pages, it comes with canvas pages as well as cute plastic insert pages so I can keep notes, swatches or a completed project.... kind of like my own little mixed media laboratory.
I wanted to decorate the cover and believe me there are layers upon layers on this is why I didn't do a tutorial. What I can say is I used modeling paste, Gesso, Gellatos, Lindys Sprays, Dyllusions, charcoals for the background and colors. Then I added chipboard, metal embellies, letters, buttons, Prima Junkyard Findings, tissue paper, fiberglass mesh tape, stamps and archival ink and topped many of them with Gold Rub N Buff.
Mixed media is so liberating because, yes there are do and don'ts when using different products together for certain results, but if you don't like it, you just gesso it or paint over it and start again. If you don't like the restriction of using just one type of medium, than mixed media is right up your alley. Many popular ways to use mixed media are altered objects and books, collages, 2D & 3D assemblage, scrapbooking, ATC's, greeting cards, book making & journaling.
It also allows you to start seeing objects around your house in a whole different light. You can recycle in your mixed media such as old book pages, tins, paper bags etc. So this will be my little laboratory for my mixed media creations. So go ahead, get messy and "Don't Be Afraid to Experiment"
 
I am entering this in the following Challenge Blogs:

June 26, 2014

Guess What Time It Is?

That's right... it's time to let those industrial creative wheels rollin'... As many of you know I ♥ Steampunk... and the challenge this week at "Sandee's & Amelie's" is creating a steampunk masterpiece using "Shades of Grey, Blue & Rust". And also at Simon Says Stamp the challenge is "I Ought To Use This More".
The two items I Ought to Use More are: canvases (I have a ton and seem to hoard them) and my Oxford Impression stamps, I adore their details
Project titled "When you run out of steam ... make ART" It was my birthday yesterday turning another year older doesn't bother me in the least, in fact I appreciate where I have come from and what I have learned thru the years and treasure what is happening in my life right now at this moment... but yesterday I was feeling really down, and depressed and my body ached and I really just wanted to stay in bed. My daughter (aka... BFF) recently moved to NYC and though I am super happy for her, I am missing her more than I ever imagined. Some days I quite frankly have no energy to do anything and I know it has a lot to do with her being gone.
Don't let me kid you .... we talk once maybe twice a day... yea I know what your thinking... get a grip lady ! When she told me she wanted to transfer her job from California to NY I quite frankly was so excited for her. I have always encouraged her to follow her heart, experience life and my door is always open for her to come home to. We've both agreed that if NY becomes her new home, I will in deed move there because I need to be with her and my future son-n-law (no one in mind as of yet) and my future grandchildren.
Some days are good, some days aren't so good... today actually was better... so see I know it's just a matter of missing my girl. Alright, enough of that... back to my project. Art can really revive me... I put on my music or favorite movie and next thing I know its several hours later.

For more wonderful inspiration, and if you ♥ Steampunk, be sure to drop by Sandee's & Amelie's challenge blog and have some fun.  And if you want to challenge yourself to something new every week... check out Simon Says Stamp... they never disappoint.
 
For a detailed tutorial on how I accomplished this canvas, check out my SNAPGUIDE tutorial below or visit my SNAPGUIDE website for more inspiring projects. http://snapguide.com/toni-burks-grijalva/guides/
Check out How to Create Mixed Media Steampunk Canvas by Toni Burks-Grijalva on Snapguide.

February 24, 2014

Sweet Sentiment

It's that time again to get together with a couple of my dearest sweet friends and I always love putting together something small for them to show them how much I love their friendship. Originally I was going to decorate some paper mache cupcake boxes that I had, but found they were much to small to put a little something in, so I came across a couple paper mache cones that I had and the lids of the cupcake boxes fit perfectly and looked just like ice cream cones and gave me much more room to put a little surprise in each.
The following are the steps I took to create my "Sweet Sentiments :

I first painted both lids to match the color tulle I would be using. I decided to make one pink for strawberry ice cream and the other brown for chocolate (of course)....
I did not have brown tulle ruffle so I had to stain the tulle. I used Lindy's Stamp Gang Dark Truffle Brown and Sandra Dee Sepia. Be sure to use gloves or tongs, this step gets really messy.
Next step I used a product I sell in my Etsy shop, it is Chocolate Mesh fabric...somewhat like burlap. I used a 9"x9" square piece and applied it to the cone using Fabri-Tac.
Using my glue gun I started from the bottom of the lid and glued the ruffled tulle around the lid all the way till I reached the top. This took 6 ft. And to complete my ice cream cone, I glued a red glittered pom pom on the top for a cherry.
This was just the perfect little project to make to wrap a couple little surprises in for my two buddies.

I took a couple of my tea stained tags from my stash (tutorial post for tea staining) and stamped an image from Oxford Impressions "Fairy Sweet" collection, distressed the edges and stained them and added some tiny white flowers to the corners... and there you have it... my sweet sentiment to my sweet friends.
 
 
The following products can be purchased in my Etsy shop :
 
art (ärt) noun - supplement, alter, or counteract the work of nature. The conscious production or arrangement of sounds, colors, forms, movements, or other elements in a manner that affects the sense of beauty.