BLOG BUDDIES

December 27, 2015

That's A Wrap for Creative Embellishments

Hope everyone is enjoying the holiday season and that they had a spectacular Christmas. Today I want to share some gift tags that I created using my Creative Embellishment chippies. 

First up the tags were just plain manila #8 tags that I tea stained... view my Snapguide tutorial HERE. Once dry I applied embossing glue and powders to the tags. 

After the embossing powder is added
Next up I used the "Showered With Love Border" chippie and embossed it with Lindy's Desert Moon Turquoise and gold embossing powder. The graphics I copied from the internet and distressed the edges with Vintage Photo DI.  
The seam binding was colored with Lindys Magica Micas in Shabby Turbine Teal and Time Travel Teal. 
For my next tag I used "Snowflake Frame" and I used white glitter embossing powder on this and adorned it with gems that were custom colored using alcohol inks. I hope you enjoyed and were inspired. This has been a wonderful year of creativity and I'm looking forward to see what 2016 brings... But as far as my projects for this year, well "That's A Wrap" ... xoxo


December 11, 2015

Twas The Nite Before Christmas

Merry Christmas crafty peeps... it's my turn on Unruly Paper Arts blog today to share my design team project with you inspired by our theme this month "Santa  Is Coming, anything Christmas featuring Santa.
This started off being a Halloween candle holder that was black. I picked it up on the clearance shelf for next to nothing. Painted it white and then I had this little glass house that I also painted white and embellished it with yummy glass & tinsel glitters. 
Added some Buffalo snow for the base and then bleached out my little bottle brush trees and also added some more glitters. 
For the finishing touches I added ribbon, pinecones, bells, and leaves all sprinkled with Rock Candy Glitter & gold. I hope you were inspired to get busy with your Christmas decorations. For photos of my step x step process jump over to Unruly's blog. xoxo Toni

This project is being entered into the following challenges: 
Try It On Tuesday - Snowflakes or Winter Whites
Altered Eclectics - Altered Art or Mixed Media
Artistic Inspirations - Challenge 146 - With A Twist of Christmas 


December 7, 2015

Peace On Earth ... for Creative Embellishments

Hi everyone, I'm here to share a December Project using the beautiful chipboard pieces from Creative Embellishments. It is with a heavy heart that I am dedicating this layout to the victims and families of the San Bernardino shootings. My prayers go out to you all.
The photograph was taken at San Clemente beach one morning when I decided to get up early and experience the morning sunrise...what a treat.  
I added Art Extravagance Texture Paste White Sand to the background and while still wet I added sea shells, fishnet, starfish and German glass glitter. 
I traced the top of the wings with hot glue for texture and allowed to dry then brushed with white gesso and added bronze patina embossing to the tops. The globe was also embossed with assorted Lindys powders. 


My title was embossed with black embossing powder, then the entire layout was splashed with black India Ink for interest. I hope you were inspired. Please drop by our blog  HERE for some beautiful inspiration. 
Wishing you peace in your life and a joyous Christmas season. Please enjoy the Harlem Boys Choir with this beautiful rendition of "Let There Be Piece On Earth"

The following Creative Embellishments were used in this project: 


I am entering this piece in the following chalenges:
Love to Create - Anything Goes Mixed Media
Mixed Media Monthly - Silver & Gold

December 1, 2015

White Christmas for Creative Embellishments

Merry Christmas everyone.... it's December and we are in full swing with our wintery projects. This month at Creative Embellishments we have this lovely pic to inspire you with gorgeous colors & elements. The twist for your project is to also add snowflakes !

For my design team project I decided to create a mixed media canvas utilizing the trees, colors and fairy in the photo, with snowflakes of course...
This is an 8.5 x 11 canvas that was sprayed first with my Lindys in scrumptious colors. Then using balsam chips I created my Christmas tree. Adding Distressed Inks in Concord Grape and Faded Jeans. Now on to my CE chippies... 
The snowflakes were embossed with assorted colors of Lindys embossing powders. The title was embossed with Winter White and the fairy was embossed with Stardust which is translucent. 
For the snow I used a Snow Marker which you heat with a heat gun to create the snow. This was a fun project with colors that I usually don't use for Christmas but they definitely work. I hope you enjoyed my canvas and please pop over to our blog HERE  to see more exquisite inspiration from the team. Wishing you all a warm and cozy December ! xoxo Toni

I am entering his piece in the following challenges: 
Country View Challenge: Create A Scene 
Artistic Inspirations: Anything Goes Twist of Christmas
Emerald Dare - Bringing in the Cheer

Below is a Snapguide tutorial for your viewing of my step x step procedure. 
Check out How to Create Christmas Mixed Media Canvas by Toni Burks-Grijalva on Snapguide.

Sugar & Spice ... Everything Nice

It's December RAQ time at Unruly Paper Arts and this month our theme is Gingerbread and/or Candy Canes. One of my favorite things to do at Christmas is bake. I have lots of favorite recipes and thought this would be a good time to create a recipe book with all my Christmas favorites.

Last year I actually created a gingerbread house to hold a Christmas photo album... pictured below:
Then I remembered that Hobby Lobby sales a smaller version of this paper mache box which would be perfect for my recipe book, so I ran down and purchased one with my 40% coupon... I think it cost me $2.50... what a deal!
So this is the end result...
The recipe book was simply created with two chipboard covers and rings were used to hold the pages together and that will allow many more recipes to be added in the future. 
Outside of Recipe Album

Inside of Recipe Album
I even got my Wilton pastry bag and frosting tip out to pipe on modeling paste for that frosting look.  
Sending you warm Christmas wishes from my craft room to yours ! xoxo Toni

This piece is entered into the following challenges: 
Altered Eclectics - Anything Goes
Artistic Inspirations -Anything Goes Twist of Christmas 
Frilly and Funky - An altered State
Emerald Dare - Bringing Bits of Cheer

Enjoy my Snapguide tutorial below for step x step process:
Check out How to Make Gingerbread House Recipe Holder by Toni Burks-Grijalva on Snapguide.

November 19, 2015

The Joy Of Christmas... for Creative Embellishments

Hi everyone...hope you've started on your holiday crafting because before you know it Christmas will be here... Today I'm sharing a 12 x 12 layout of my daughter and our two precious fur babies. This photo was taken a few years ago and it was about time I scrapbooked it. 

I started by layering my new background papers and distressing all the edges, then using my "Sweater Square" stamp by Stampendous I heat embossed it with white powder. I then backed my photo with two photo mats and distressed the edges there also. Now lets get crackin at our chippies. 
First up is the title and "Joy" and I painted this red and then gave it a thick coat of DecoArts Liquid Glass... much like Glossy Accents. The greenery around the photo is "Garland With A Bow" chippie and I added Golden Stucco Paste for texture and then painted it green and swiped over it with Walnut Stain DI for shadowing. For the berries I used my hot glue gun and made dots on my craft mat, then once dry I colored them with alcohol ink in Red Pepper. 
The Flourish Christmas Tree was painted white and then a coat of crystal Stickles was added to the top. The bulbs are different size dew drops that were colored with alcohol inks. The Ideology numbers were painted with black gesso then I used a sanding block to scrap away some of the paint. 

Last but not least... I harvested some pine cones from my yard, I broke away the scales then glued them back together to form flowers. Decorated the tops with Snowtex and sprinkled with Diamond Dust. Well there you have it... hope you enjoyed and were inspired. Be sure to drop by Creative Embellishment to check out their beautiful embellishments ! Warm Wishes for a beautiful Christmas season. xoxo Toni 


November 15, 2015

Moments With The Master

Hi all.. Toni here with another project for Unruly Paper Arts and our theme is "Noteworthy".  I picked up some of these journals awhile back for $1.

I thought they would be perfect for my friends daily devotional journals and with Christmas right around the corner they would make great gifts.
There are so many things you can do to these books. I wanted to keep them pretty simple because they will be writing in the books, so I left alot of the ribbons and such from the sides of the books. 
I cut a hole in the center of the cover to have there initial peep through. I actually saw some journals with this hole is where I got the idea, but the store was out of those journals when I went back so I made my own holes in these. 
The flowers and ribbons were colored with assorted Lindys Stamp Gang sprays and magical micas. 
The little crosses were purchased at Hobby Lobby for $1.99 a bag and then transformed using Deco Arts crackle varnish and antiquing creme. I loved how they turned out.  I have several more of these books to make and hope my friends enjoy journaling their "Moments With Their Master". 

Please feel free to enjoy my Snapguide tutoral of my creative process below: 


Check out How to Alter Inexpensive Journals by Toni Burks-Grijalva on Snapguide.

November 14, 2015

The Book of Love .. for Rhedds Creative Spirit

Hi everyone... it's my turn to inspire you with a tutorial for this months Mid-Month @ Rhedds Creative Spirit. I have chosen to create an altered book frame which is a Christmas present for my mother. The photos are of her beautiful grandparents.

This process is very easy but a bit long, so for your pleasure I have made a SNAPGUIDE tutorial below for a step x step process of the project. 

I purchased the book at a thrift store for $1.00. Here is what the book looked like at the beginning. 
And the supplies that I recommend are ...

X-acto Knife
Mod Podge ... I used handmade... 1/2 water + 1/2 regular white glue mixed well
Adhesive
Distressed Inks
Embellishments
Flowers
Inka Gold
Black gesso
Lindys Sprays... but not necessary
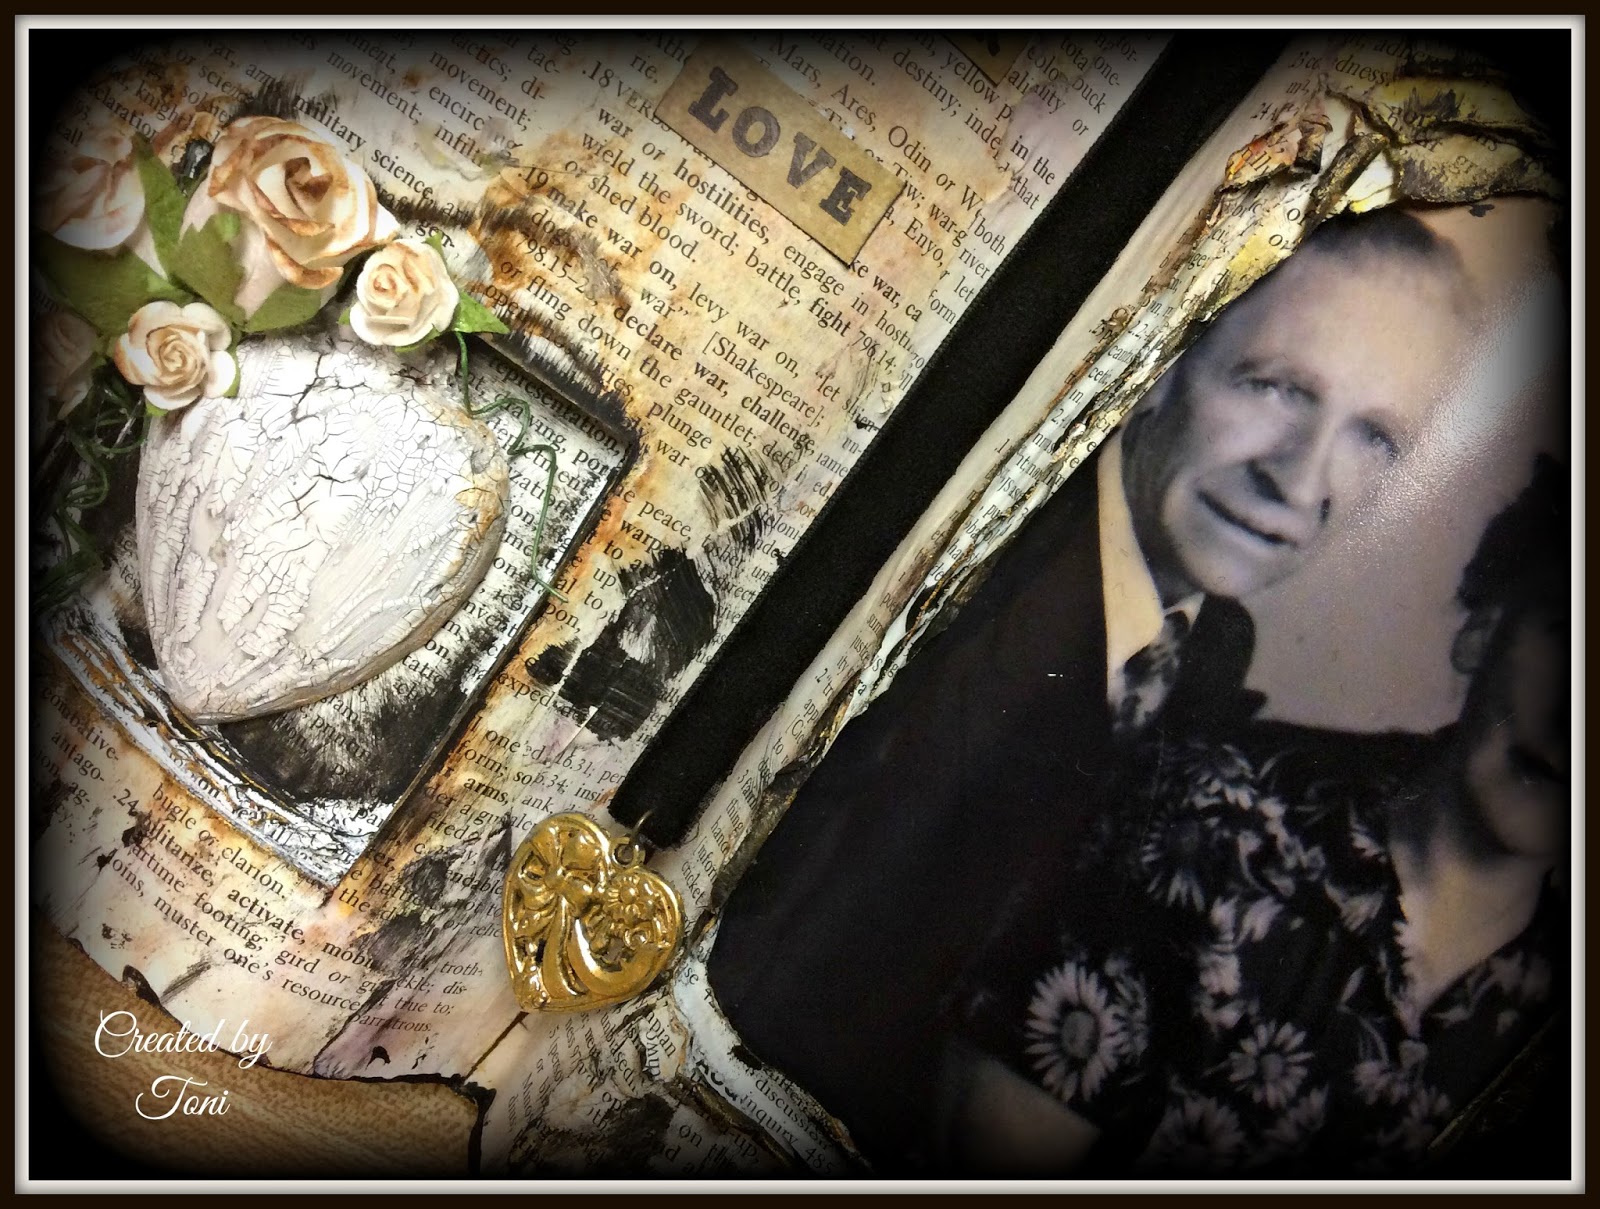
The photo is actually black and white but I distressed over it with Vintage Photo DI to compliment the book frame. 
Here is a closeup of the top of the book... nice and vintage. The glue mixture allowed me to mold and wrinkle the pages to achieve the look I was going for. 
Flowers were added for that bit of whimsy and give it a more delicate look. 
Since this is "The Book of Love" I thought it only fitting that I cut a little niche and place my Prima Heart all crackled and distressed in that area. Added more flowers for interest. The bookmark is velvet ribbon with charm attached. 
And there you go... easy peasy, but messy... my kind of project. I hope I have inspired you to go and re-purpose an old book. So many things you can add and change around. My next project is for a friend of mine that is a new grandma... I'm using an old children's storybook for the foundation to place her beautiful grandbaby's photo...

And now sit back and enjoy the Snapguide tutorial... for more tutorials visit my Snapguide webpage HERE. 

Check out How to Create Altered Book Frame by Toni Burks-Grijalva on Snapguide.

November 6, 2015

Fall In Love With Art ... for Creative Embellishments

It's a new month and new inspiration from Creative Embellishments to get those artsy wheels turnin....First off... check out this great pic with all those fun fall elements and the pretty color palette. The added twist for this challenge is to incorporate a flourish in your piece.
This was my design team interpretation of the photo...
I created this canvas by first using Art Basics's Graphite Texture Paste and running it through a brick stencil. Once dry I added Inka Gold in Platinum and Gold to highlight the bricks. 
I then gathered my Creative Embellishment chippies gobbed on some beautiful mixed media products. The dragon fly flourish was painted with acrylic and then aqua stickles were added for a pretty bling. 
The Falling Leaves chippies I primed them first with white gesso and then applied assorted Lindys Stamp Gang Magical Micas  that provide such a glorious iridescent glow. On the pumpkin corners I painted them first with acrylic then coated them with DecoArts Liquid Glass (much like Glossy Accents) and while still tacky I dribbled Alcohol Ink in Ginger here and there and then sprinkled some seed beads for texture. 
The mushrooms were simply covered with Art Basics Texture Paste Sand and then once dry I added Distress Ink in Walnut Stain and Vintage Photo. My frame was painted with black gesso and then using Inka Gold I rubbed the high areas for a gilded effect, then added my title which was printed on the printer and then sprayed with Lindys for a vintage look.  I hope you will come create with us this month and have an opportunity to win some free merchandise from Creative Embellishments. Happy Fall and have a creative week !
The following Creative Embellishment products were used:

art (ärt) noun - supplement, alter, or counteract the work of nature. The conscious production or arrangement of sounds, colors, forms, movements, or other elements in a manner that affects the sense of beauty.